

This post will you through everything you need to know to create your first collection (or just an NFT) on OpenSea from a technical standpoint. The technical end is actually the simplest part but there are still a few things to know.
A. Create a profile
Click on your icon top right to complete the profile that will apply to ALL your collections. Your profile will eligible for certification status when your volume reaches 100ETC, and you fill out all the appropriate documents.
Click on your profile to see your holdings including what you have purchased and the NFT collections you have just created, and to access the editing functions.
If your wallet is not connected, you may be asked to select one and a drop-down will appear from the extension.
We recommend MetaMask as the largest decentralized Ethereum wallet. For Solana, you can select Phantom.
B. Posting an “item” or NFT on OpenSea
Start at the Opensea home page.
- If you have not yet done so, Connect your wallet
At the top right click on Create and the prompts to connect your wallet. You’ll need to select your wallet and then pull down your wallet from the Chrome extension (=in the case of Metamaks).
2. Create a new item
Same button, click on “Create” top right, once your wallet is connected, you’ll see a prompt to upload your NFT image.
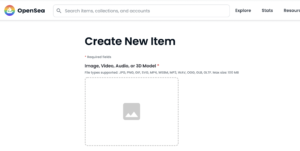
You can drag or upload an image, video, audio, or 3-D, model. However, it must be smaller than 100mB. If it is larger, such as an animated gif, you need to host it elsewhere, but can still list it on OpenSea.
3. Give the item a name, or number, unique to that image.
To structure your account, name your profile, then the collection, then the item. Best practice is to set this up in a Google sheet, so that you have all the names ready to go.
For example: Profile is Lost Animals and one collection is Lost Cats, your item name could be Lost Blue Cat, or Lost Cat #1. With hundreds of names, it can get complicated, so work out the structure in advance.
Utilities often name their NFT with a number – NFT Certification 1.0 – while art tends to have names that correspond to the rarity – ie Green Lost Cat with Umbrella.
It’s also a good idea to search on the name in Opensea to make sure it is not already taken. The URL must be unique but names can be the same or similar.
. 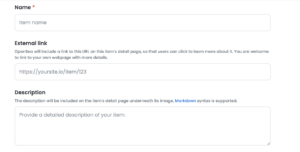
4. Add an external link
Of course, you have a website! If don’t, plan to get one. Most experienced investors will look there first to check you out.
For the external link for one item, either link to the home page of the website that shows your overall concept, or the specific page where a customer can find more information on that NFT item, whichever makes more sense.
If it is a Lamborghini NFT, it makes more sense to link to the page that explains the NFT, since the company website is not directly relevant. But if it is an unknown project, the home page of your website may be better.
You definitely want to link out to show a file larger than 100 MB, which is the max on OpenSea. So if you have a video or other large file, use this link to show it.
Keep in mind that serious investors will often not even look at a project that does not have a website, and they will want to see how well it is designed and thought-through.
5. Describe the object represented by your NFT.
You will have a short paragraph for this that will appear in the listing (if you need more room, use the URL to point to a web page). You can also include, for example, a link to your manifesto, and incentives for buying (extra things they get such as physical art or object, charitable contribution, coupon, or tickets to an event) that are unique to the holder of that NFT. This may be the only chance you have to explain the item’s utility and benefits before the customer moves on so pack in your story/incentives/utility.
Later on in the page, you can use the “unlockable content” field to add the “hidden information,” but only buyers can see or access that content.
6. Select or create a collection
Select from the drop-down, or if you don’t have a collection, create it next. Instructions are included in C.
7. Properties
This is the important part, as viewers and potential buyers, will see these on the left of the item page. Each property shows up as “one of # number” when your customer see the NFT page.
So, again, if it is a large collection even 100, you may want to map this out in a spread-heet. For example, the default text here is “Character” in the left box and “Male” in the right box. You could make this “Selfportait” and “Smiling” or “NFT Certificate” and “#1” or “Green unicorn with guitar” and “purple mane.”
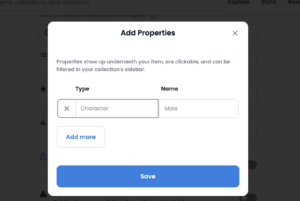
Make sure that you include the one-of-a-kind rarity, so that they know which feature is unique.
Essentially, properties are just metadata that goes with the item, such as a hat, background color, or a pipe that Opensea includes on the site, and which is also searchable.
8. Levels
This is mainly for NFTs related to games, so skip this. Only used for Metaverse in-game projects.
9. Stats
This is also primarily for gaming sites.
![]()
10. Unlockable content
This is a super important field where you can add information only the buyer sees on the confirmation page after the sale. This page is not an email, or in your wallet, it is a web page on Opensea viewable only by the buyer.

The unlockable content is also not in the smart contract on the Blockchain itself.
So anything you’ve promised to the buyer that this off-chain goes here. Examples include a promo code to redeem an offer, a link to a coupon code, a form to fill out to redeem a physical object, QR codes or password for access to a party. Unlockable content is used both for utility and to incentivize customers and is an important part of your strategy.
11. Number of copies
Leave this at 1, unless you are intending to make a fungible NFT, ie a series of the same thing. Memberships can be one of a series, and still create scarcity by being limited to that number.
11. Payment tokens
Leave this alone so anyone can purchase in ETH or WETH, which is helpful if they are using a different blockchain, you can add if you would like to be paid in another token such as wrapped Bitcoin or USDC.
12. Create
Once created your item will now appear, unpriced, in an untitled collection, until you create the collection and add the price, select fixed or auction, and limit the time on sale.
13. Freeze Metadata
Don’t click on this unless you do not want to edit the metadata again. The Freeze Metadata button will make your NFT more searchable but it cannot be changed.
C. Creating a price
Even if you have an NFT, it is not priced or on the open market as yet. So click on your profile to find your NFT, and click on the item to open its page. You should see a big green “Sell” button at the top right of the NFT item page Click on that to set the price.
You now have options to select “Fixed price” or “Auction“.
A fixed price is perfect for a utility, such as “an hour consultation” but most items with large communities work better as auctions.
The auction keeps you from guessing too high or too low with your fixed price. If you expect to have a significant market, you also want to limit the amount of time for the auction to create some urgency.
D. Fees
It is not listed yet but Opensea charges $50 to $70 per wallet to initialize them one time only.
You also will not see gas fees, but the NFT is minted when the buyer buys, and the buyer also pays the gas fee. So if you are selling for very small amounts, a no-fee exchange such as Solsea or Polygon may work better. Keep in mind that these two exchanges do not support auctions and are fixed prices only.
Opensea also takes 2.5% on the first sale of that NFT from the seller of the NFT – that’s you – as a revenue share. It does not take a share thereafter from the creator, or a share if sold on another platform. So the creator is charged this fee the first time, but the buyer pays it if they resell that NFT.
You will also see the “Creative service fee” which is the percentage in royalties that you will set at the Collection level, typically 2 to 5% you paid into your wallet if and when the NFT is resold, but only on the Opensea platform.
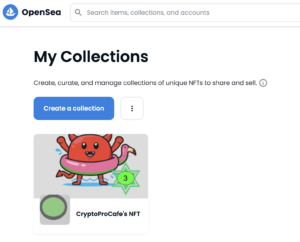
D. Create a collection
A collection is a number of items with one theme, reason, and idea.
There is no simple bulk upload. Unless you use a separate program such as NiftyMints, you’ll have to upload one at a time. Here’s an instructional video on bulk uploading via niftyMints. Basically, you are minting on their platform and they are auto-uploading to OpenSea.
To create a collection go to your “profile” top right and scroll -down to click collection, then click on the blue button: Createa collection. You can also click on “untitled collection” on your first NFT to bring up the page to edit your collection and three dots to edit the collection.
- Upload the three images.
Note that the banner will be at the top of the collection page. You are allowed a logo & feature image. The banner should be a different image since the feature and log are set inside of it.
2. Name the collection
You want to give the collection a name that represents its collective theme. Keep in mind the structure you have created: Profile, collection, item (NFT), so that the brand is consistent and easily searchable on OpenSea.
3. Edit the URL
Rename the end of the URL. Essentially, give an associate name that you can easily send.
4. Describe your collection
What is the overall tone, theme, purpose, idea behind your overall project? This will show on your collection page, and you may want to include any important links, such as to your manifesto or website.
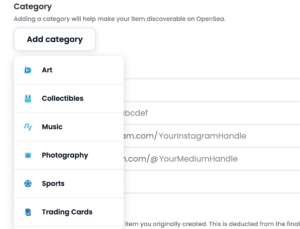
3. Add a category
This is super important, because may users will find your NFT by searching. So you may need to scroll down to see all the options, including utility, and pick the right ones that allow your project to show up in more searches. This is the first place that people search on OpenSea. Make sure you scroll all the way down to see categories such as Utility that are not immediately exposed. They are there.
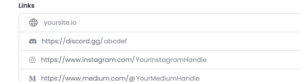
4. Add your website and social links
Your website’s home page and social links are important to many investors, especially experienced ones. They want to know how active you are on Twitter, Instagram and Discord in particular – Discord is a better measure of how engaged the community is, so they should be talking and asking questions. The home page of the website for your collection should be well designed and have information on the project and how to communicate with the project owners on social media.
5. Creator service fee
The creator service fee is the royalties you are paid when your NFT is resold on OpenSea. These should be between 5 and 10%. If the royalty is too high it will scare off buyers.
6. Choose the Coins for payments
The default is ETH and WETH, or wrapped ETH which can be used for transactions on other blockchains Polygon. Best to leave these alone unless you have a unique reason. Don’t post your project twice on different blockchains, or it is considered “scammy.”
Note that lazy minting is assumed, which mints the NFT is not on the blockchain until it is bought and the gas fee is paid by the buyer. The seller also pays 2.5% to Opensea as a commission on each transaction. There is also a $50 go $100 one-time fee per wallet.
Some project owners are wondering whether to create their NFT on Polygon versus Ethereum to save on fees. Just keep in mind that once you have frozen these properties you cannot change or switch. Also note that people will need to use the Polygon network to purchase on Polygon, and will pay with wrapped Ethereum, while the transaction fees will be in Matic, hence less expensive. Polygon like Solana does not. have auction-based pricing.
7. Add a collaborator
You have the option to add collaborators if someone else is managing your collection.
Once you freeze the properties you cannot “unfreeze” so hold off until you are sure you have everything correctly stated.
Now you have a collection! Our advice is to create your website, community, and other marketing BEFORE you launch the NFT collection so you are ready to go, but put a wait list with email/Discord capture on the website so you can get a head start when you do launch.
A note re bulk uploading: You can bulk upload using NiftyMints, as mentioned, there is an instructional video on bulk uploading via niftyMints here.
You can also create an image of a file too large to store on Opensea’s server, and include link to the server where the larger file is stored.
Questions? Send an email to Cryptoprocafe@gmail.com